Thinkst Canary
Beta: The Thinkst Canary connector is labelled Beta in the integration catalogue.
The Thinkst Canary connector detects attackers touching your decoys. It collects two kinds of data from your Canary console:
- Incidents, which covers:
- Canary device alerts, for example a login attempt or a port scan against one of your Canaries
- Canarytoken triggers
- Operational events, such as a Canary disconnecting or settings changing
- The console's audit trail, which records activity in the console itself, such as logins, Canarytoken changes and incident acknowledgements
The data goes into SenseOn Log Ingestion and is searchable in Hunt Lab. Canary device alerts and Canarytoken triggers are recorded as findings, operational events as application activity, and the audit trail as identity and access activity.
Setting up the connection
Create the Canary API key first (see Creating the API key below), then:
- In SenseOn, select Integrations in the main side menu, then Set up a new integration. See Data Connectors for the set-up page.
- Select the Thinkst Canary card to open the connection form.
- Fill in the form as described in the table below.
- Select Connect.
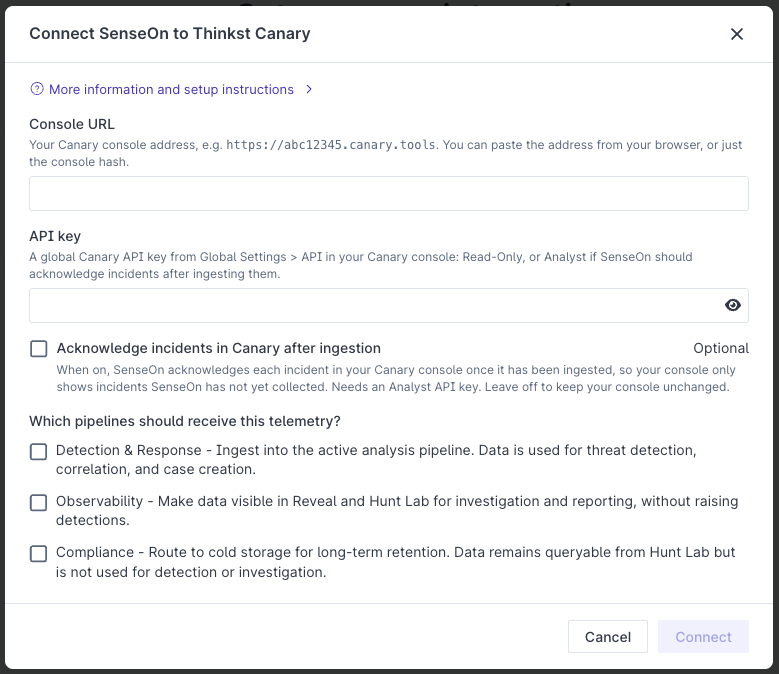
| Field | What to enter |
|---|---|
| Console URL | Your Canary console address, for example https://abc12345.canary.tools. You can paste the address straight from your browser, or enter just the console hash (abc12345). SenseOn turns either into the https://<hash>.canary.tools form. |
| API key | The global API key you created in your Canary console. Select the eye icon to check what you pasted. |
| Acknowledge incidents in Canary after ingestion | Optional, and off by default. Tick it only if you want SenseOn to acknowledge each incident in your Canary console once SenseOn has collected it. This needs an Analyst API key. See Acknowledging incidents after ingestion. |
| Which pipelines should receive this telemetry? | Choose one or more. Detection & Response uses Canary incidents for threat detection, correlation and case creation. Observability makes the data searchable in Hunt Lab and Reveal. Compliance keeps it in long-term storage that remains queryable from Hunt Lab. We recommend Detection & Response and Observability, because every Canary alert is a potential attacker. |
When you select Connect, SenseOn checks that the key can read your Canary incidents and audit trail, and that it can acknowledge incidents if you ticked that option. If Canary rejects the key, the form shows the reason so you can correct the key or the console URL.
Creating the API key
- In your Canary console, open Global Settings > API and make sure the API is enabled.
- Add a new global API key. Do not use a flock API key. A flock key only sees one flock, so it misses incidents from your other flocks.
- Choose the Read-Only role. This is all SenseOn needs to collect your data. Choose Analyst only if you want to turn on acknowledgement after ingestion.
- If you restrict the key to IP ranges, add SenseOn's egress IP addresses. Ask your SenseOn contact for the current list.
SenseOn stores the key encrypted and never shows it again. Apart from the optional acknowledgement, SenseOn never changes anything in your Canary console. See Thinkst's API documentation for more about API keys and roles.
The API key cannot be edited later. To use a different key on an existing connection, for example an Analyst key so that you can turn on acknowledgement, delete the connection and set up a new one with the new key.
Acknowledging incidents after ingestion
When this option is on, SenseOn acknowledges each incident in your Canary console after SenseOn has received it. This works like the "After ingestion" option in Thinkst's Splunk add-on.
- It needs an Analyst API key. SenseOn checks this when you set up the connection.
- It is best effort. If an acknowledgement fails, SenseOn still collects your data.
- Each incident SenseOn acknowledges leaves the console's unacknowledged view. Incidents can also be acknowledged by people in your team, and an acknowledgement can occasionally fail, so the unacknowledged view is not a list of what SenseOn has yet to collect. Leave the option off if your team works incidents in the Canary console.
- Each acknowledgement is recorded in your console's audit trail, which SenseOn also collects.
How and when data is collected
- SenseOn checks your Canary console about every 5 minutes.
- Canary keeps adding events to an incident while the activity continues. SenseOn sends an incident once it has been quiet for 3 minutes, or once it has been open for 15 minutes, whichever comes first.
- Each incident is sent once, as one record. Events Canary adds to an incident after it has been sent are not sent again.
- An incident with more than 200 events carries its first 200 events, plus the total event count.
- Incidents deleted in the Canary console before SenseOn's next check are not collected.
When you first connect, SenseOn collects:
- the incidents still on your Canary console, both acknowledged and unacknowledged
- up to about 7 days of the console's audit trail
Credentials typed by attackers
Some Canary alerts include what an attacker typed, such as a username and password entered on a decoy login page. SenseOn receives these exactly as your Canary console sends them. Canary's Mask sensitive data console setting controls whether they arrive masked. It is usually on by default.
Using a Canary webhook instead
Canary can also push alerts to SenseOn by webhook, through Log Ingestion. This is a separate route. You can use either. Compared with this connector, the webhook route:
- carries only the first event of each incident
- does not include the console's audit trail