Endpoint Protection (EPP)
The Endpoint Protection (EPP) feature of the SenseOn Universal Sensor is a sophisticated protection capability designed to detect and automatically block a wide range of threats on your endpoints. By leveraging real-time scanning, blocking, and quarantining capabilities, EPP actively prevents malicious files and processes from compromising your systems. Utilising advanced threat intelligence, heuristics, and machine learning algorithms, it offers a multi-layered endpoint protection against a wide array of cyber threats, including malware, ransomware, and zero-day attacks.
Independent testing has proven the ability of SenseOn’s EPP to minimise false positives and software conflicts. However, as with all software, it is crucial for IT departments to conduct thorough testing and phased rollouts to ensure compatibility and effectiveness within their unique IT environments. This document provides best practices and recommendations for integrating the EPP feature safely across your IT estate.
Pre-Deployment Preparation
1. Assessment and Planning
- Inventory your assets: understand the scope of your IT environment. Catalogue all devices, operating systems, and applications that will interact with the EPP feature.
- Identify critical systems: prioritise systems based on their criticality to business operations. This will help in devising a phased rollout plan.
2. Compatibility Checks
Software compatibility: verify that the EPP feature is compatible with existing software applications and operating systems within your environment.
| Feature | Windows (8.1+) | macOS (Apple Silicon only) |
|---|---|---|
| Full On-Access File Scanning. Scans files being accessed by users of endpoint devices, taking advantage of our market-leading threat intelligence and detection engine. |
 |
|
| Automated File Quarantine. Quarantines malicious files and moves them to a secure location on the device, concealed from the endpoint user. |
|
 |
| Automated File Blocking. Blocks access to malicious files, which remain visible to the endpoint user. Notifies the user that the file they are accessing is blocked, and to contact IT support. |
Not required | |
| Process Protection. Identifies process-based malware, attempted exploits, and attacks by monitoring the systems memory space. |
|
|
- Hardware requirements: ensure that all endpoint devices meet the minimum specifications required for optimal EPP performance.
Running SenseOn alongside other AV solutions
When SenseOn is run alongside another AV solution, you may need to add additional settings in that solution.
Microsoft Defender for Endpoint may benefit from exclusions for SenseOn's own files and processes to avoid it interfering with the SenseOn agent. If you are seeing performance issues, it may be worth ensuring Defender has exclusions in place for:
C:\Program Files\senseon-see\C:\ProgramData\senseon-see\- The
senseon-seedservice process
3. EPP Configuration
- Tailor the EPP policies to balance security needs and business operations. Consider creating exceptions for trusted applications to reduce false positives. To do this, you will first need to create segments in order to define configuration for given devices.
Segment creation: To create a segment go to
Settings>Device Configuration>Create a new Segment
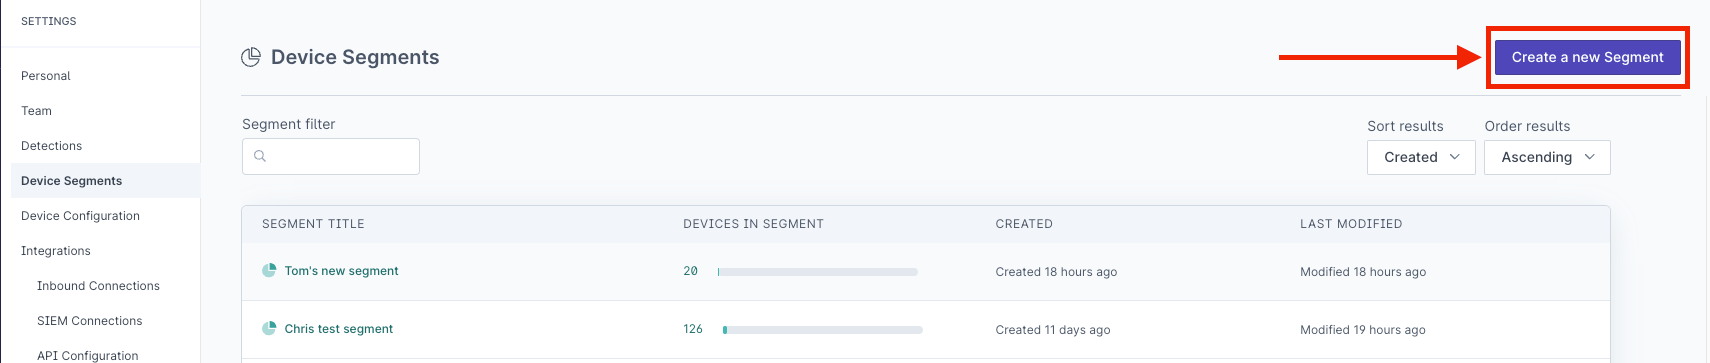
- Once you have created the segment to which you wish to apply an EPP configuration, you can apply the settings for Antimalware (File-based real time scanning) and Process Protection (memory-based protection).
Availability: Antimalware and Process Protection are licensed modules that SenseOn enables for your organisation. If a group appears locked with a prompt to upgrade your licence, contact SenseOn to enable it.
Device Configurationand select the segment you wish to apply the settings to. Clickeditto change a setting.

Configuring Antimalware (File-based scanning, quarantine and removal)
Within the Antimalware settings, you have the option to turn the feature on/off; configure the response automation settings; add alerting exclusions; and add response exclusions.
- To turn the feature on, change the setting pictured below to
On.
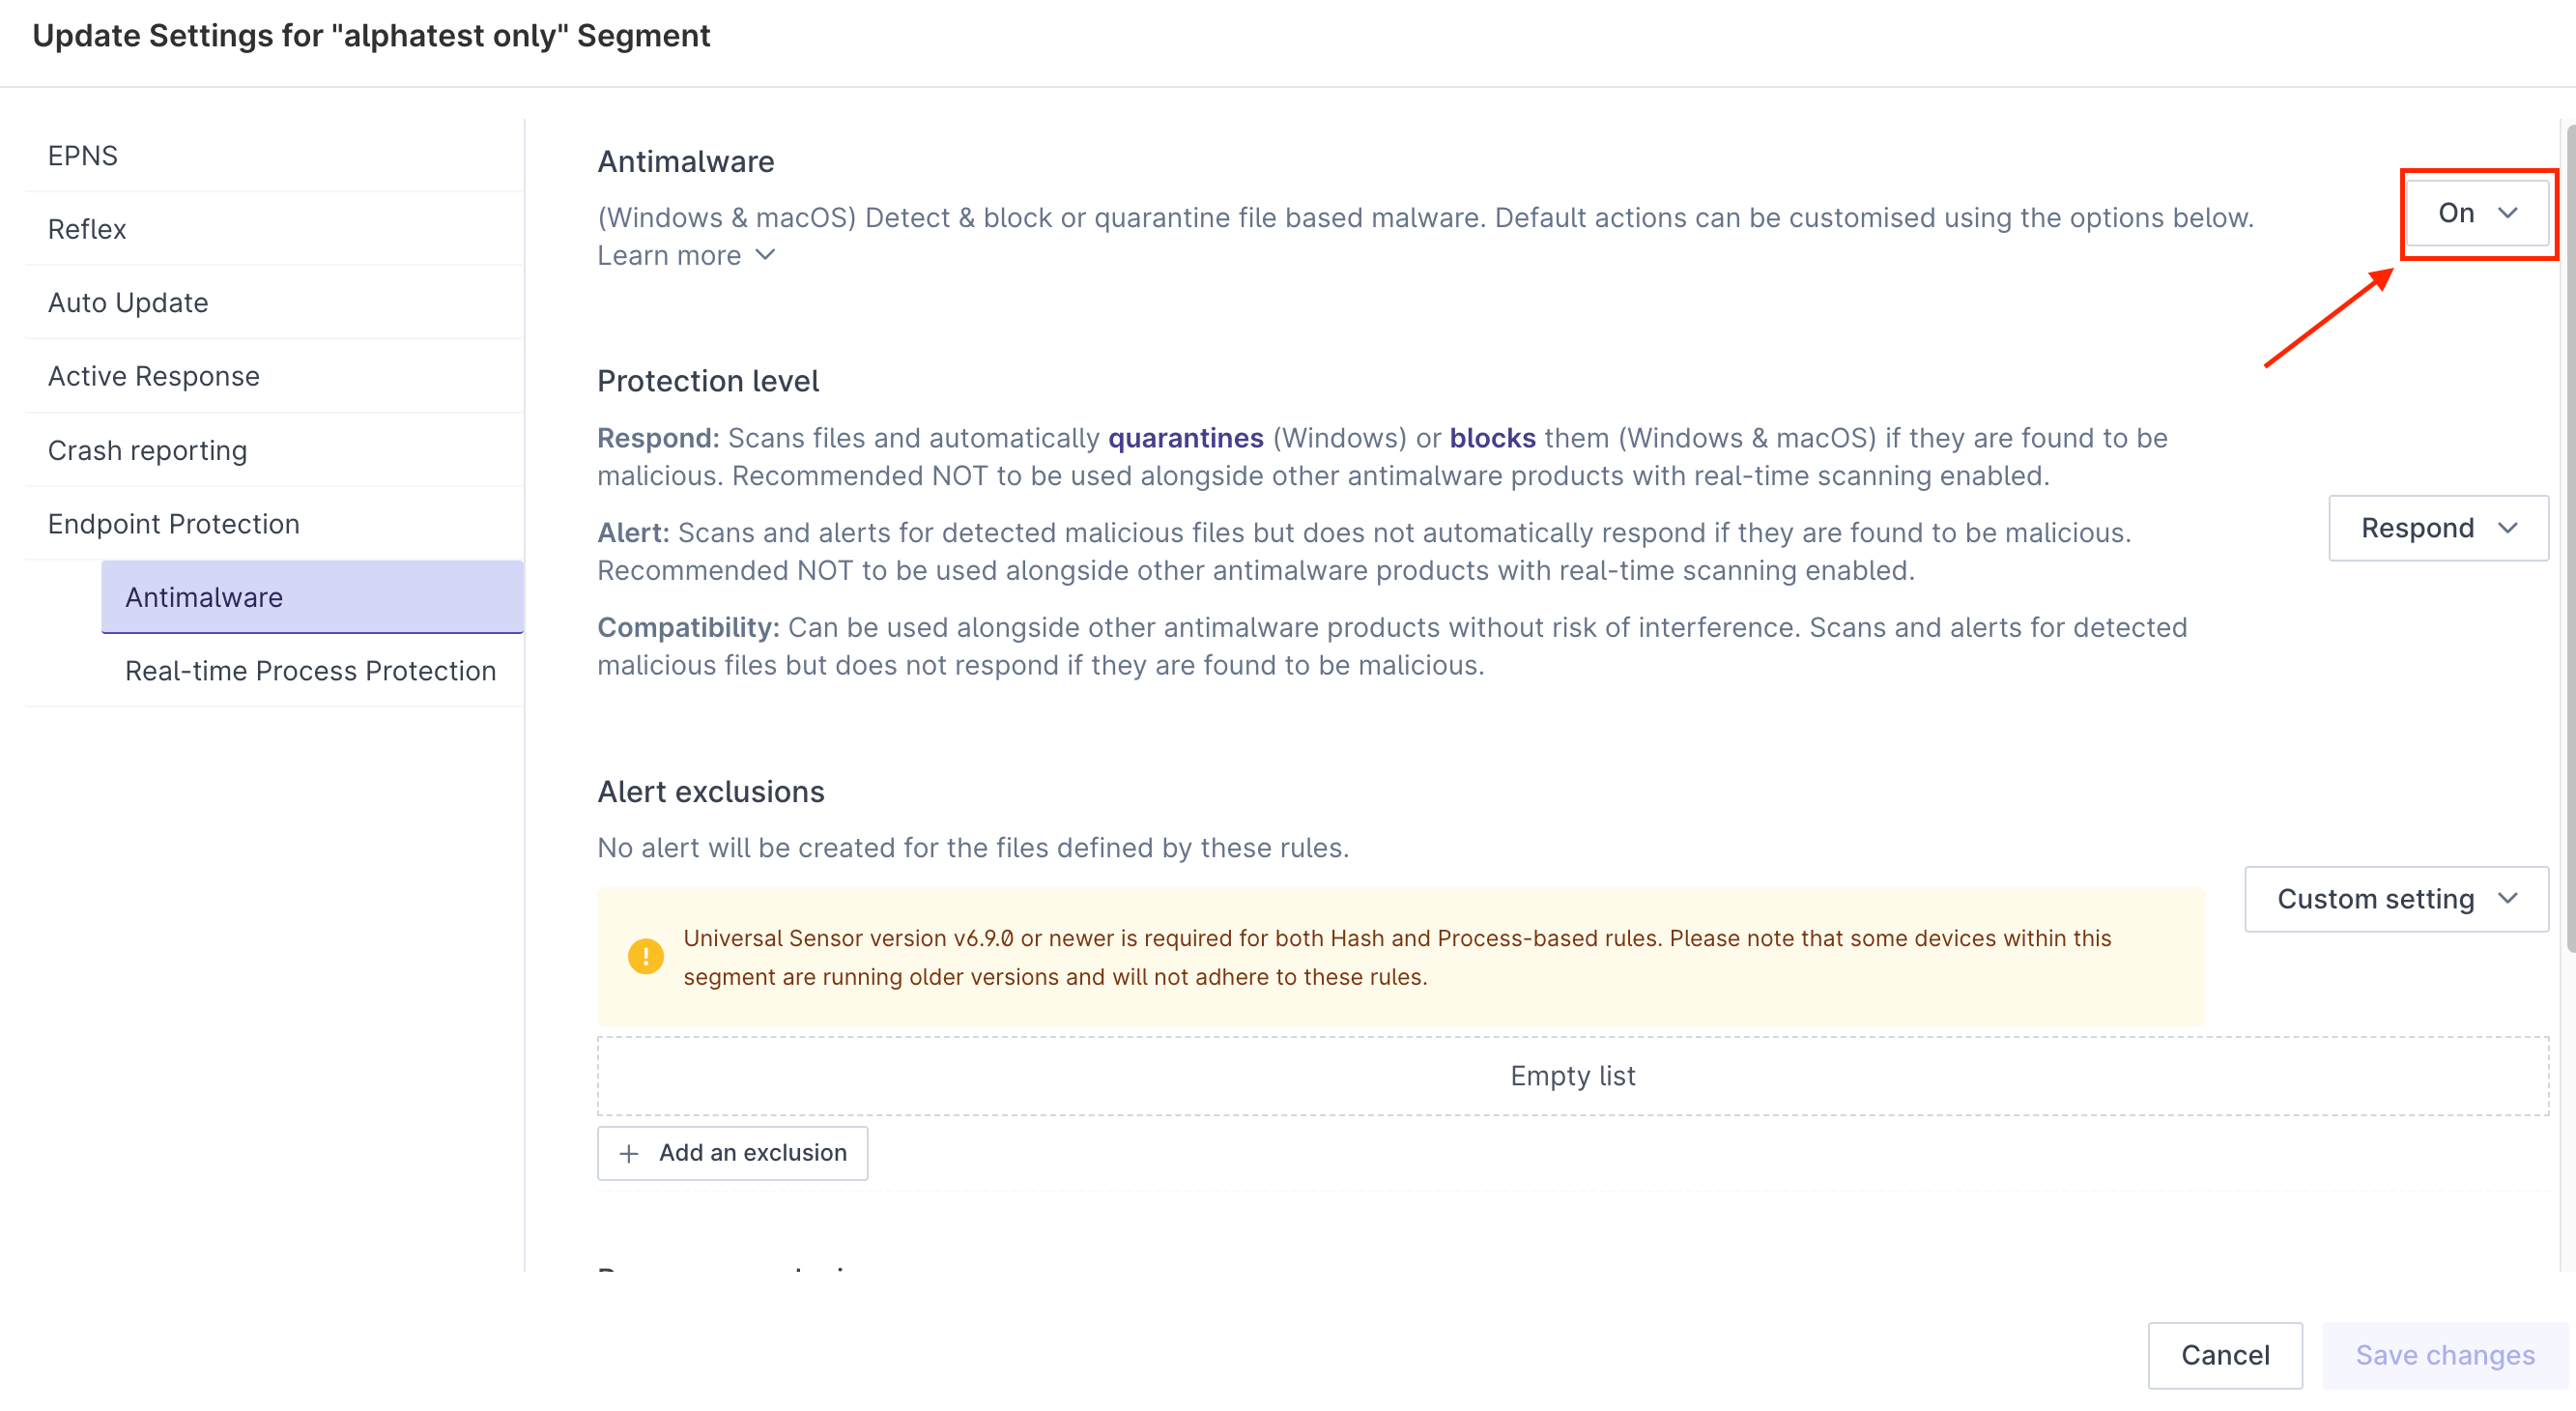
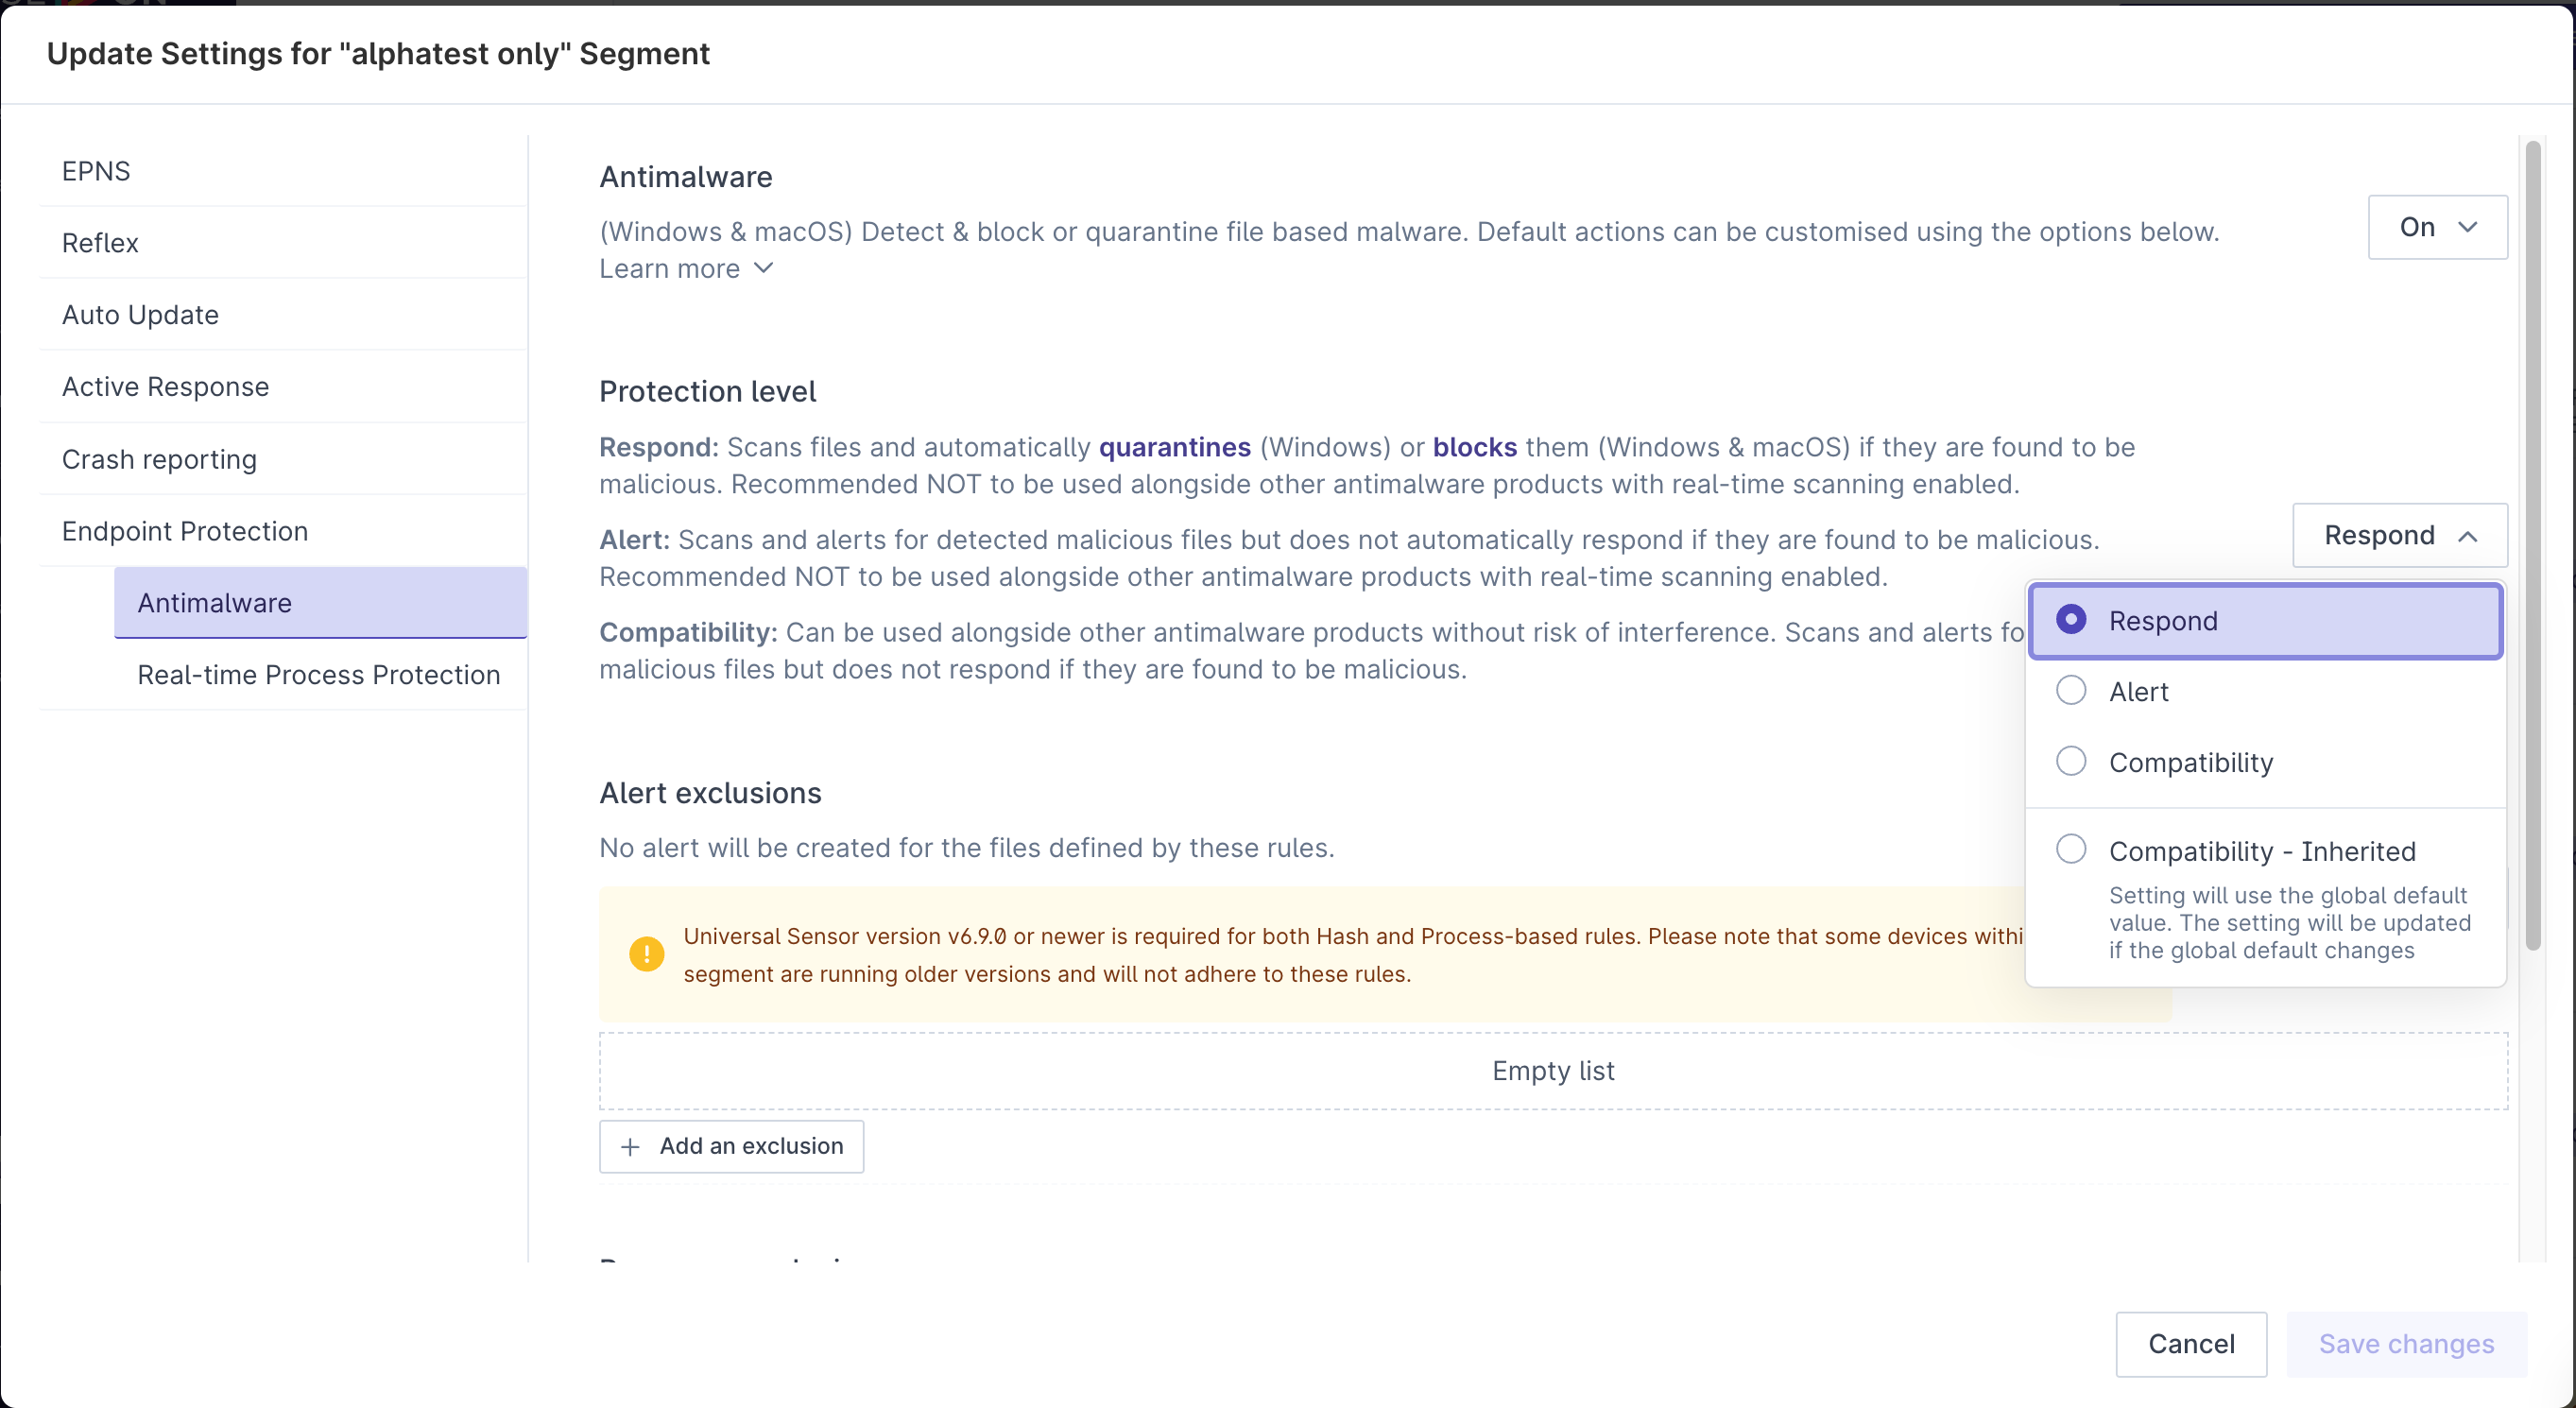
The Protection level setting enables users to adjust the extent to which the system takes action on the user’s behalf. The 3 settings available include:
Automated response. EPP will automatically quarantine malicious files on Windows devices running Universal Sensor v6.8.0 or later (earlier sensors block access to the file instead, as on macOS), and block access to files deemed to be malicious on macOS devices. See Managing quarantined files for what this means for each device.Alert only. EPP will alert for malicious files found on both Windows and macOS devices. It will NOT automatically block or quarantine these files. This can be done manually by the user upon review.Run alongside another AV. Similar to theAlert onlysetting, but this mode of EPP can be used alongside other AntiVirus products without risk of interference.
Warning: Do not enable EPP in
Automated responseorAlert onlymode if you have another AntiVirus product running on the device.
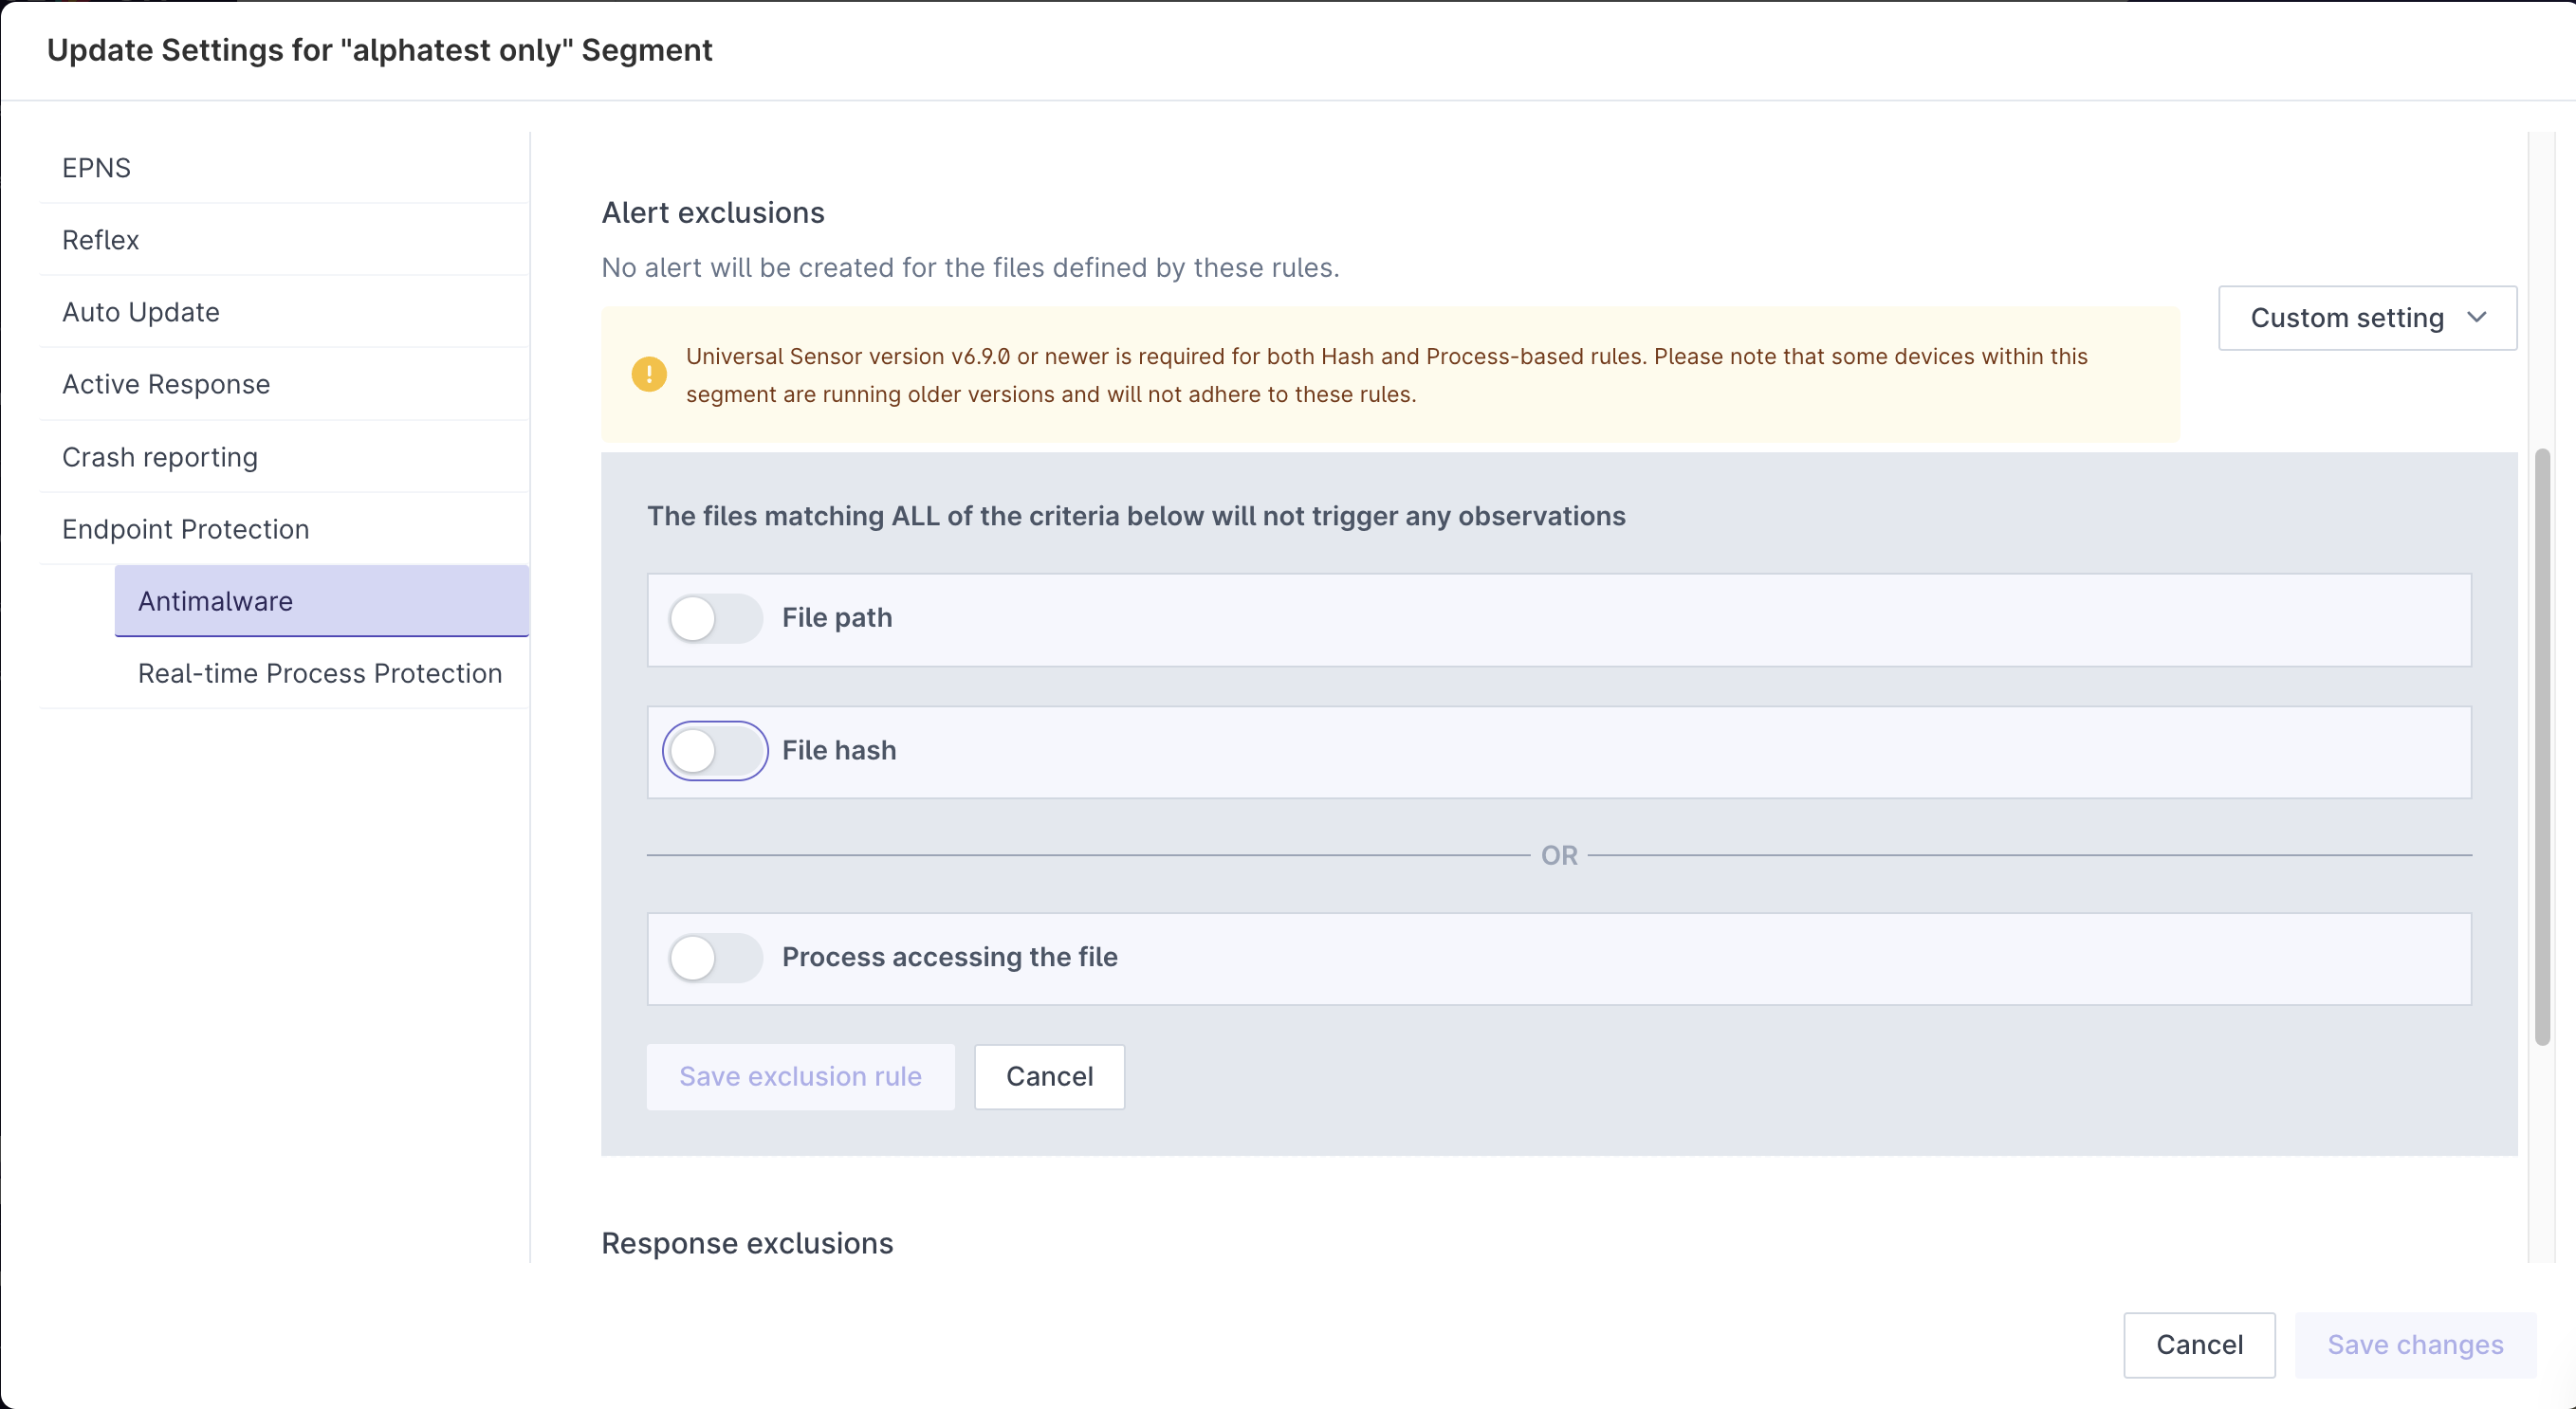
Alert Exclusionsprovides the ability to reduce potential false positives by creating rules to avoid alerts being generated. The variables for these rules include the file path and/or file hash of a file attempting to be accessed (for specific files you do not wish to be alerted to) or the process accessing files (for more widespread processes which should be allowed to access files).
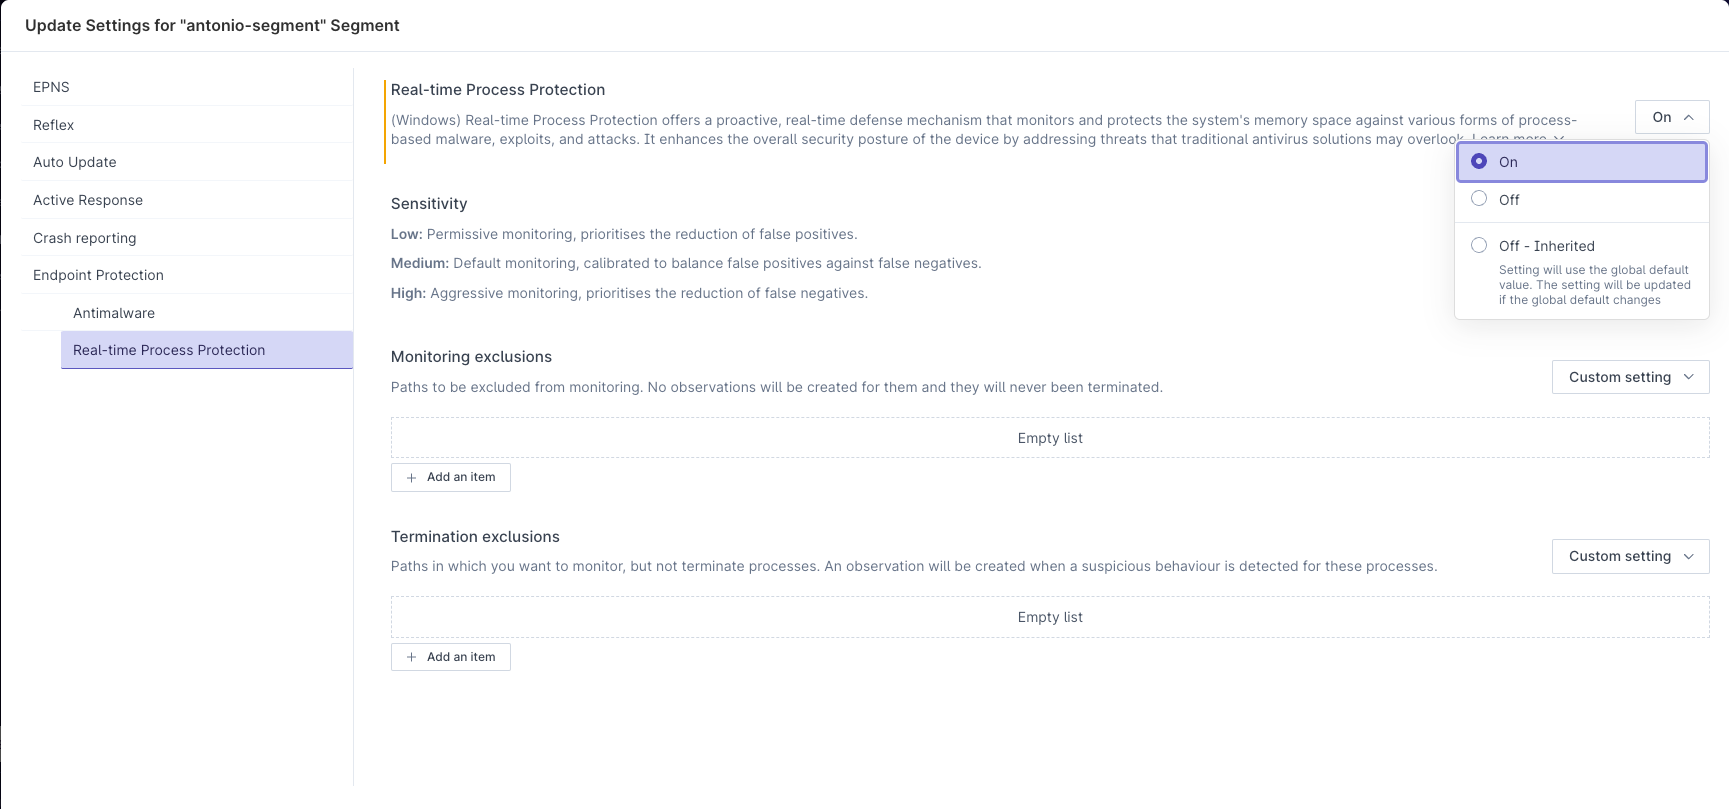
Configuring Process Protection (in-memory process scanning & termination)
Within the Process Protection settings, you have the option to turn the feature on/off; configure the response automation settings; add alerting exclusions; and add response exclusions.
- To turn the feature on, change the setting pictured below to
on.
- The
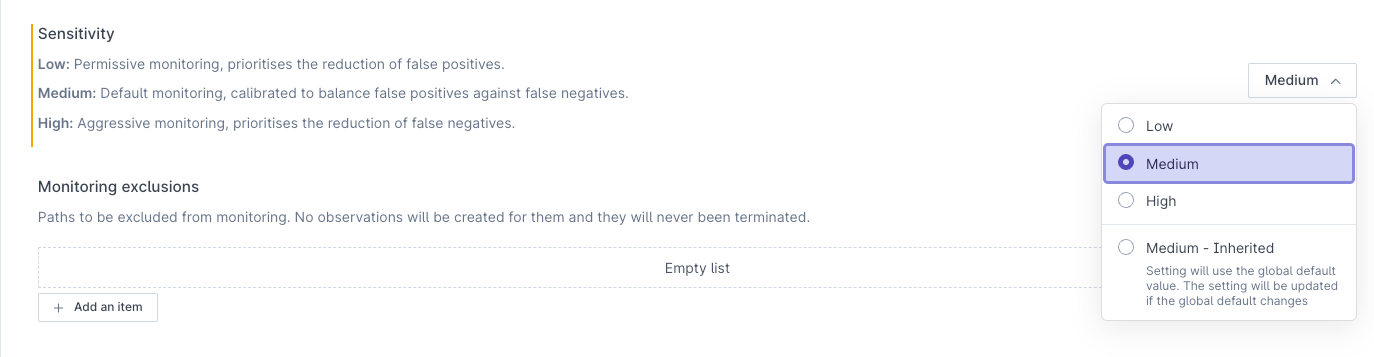
Sensitivitysetting applies the degree to which the EPP feature will prioritise increased likelihood of false positives to false negatives. High sensitivity will reduce the risk of a true threat being missed, but increase false positives. Low sensitivity will reduce false positives but increase the risk of a true positive being missed. We recommend applying the medium setting to reduce risk whilst also reducing the likelihood of false positives.
-
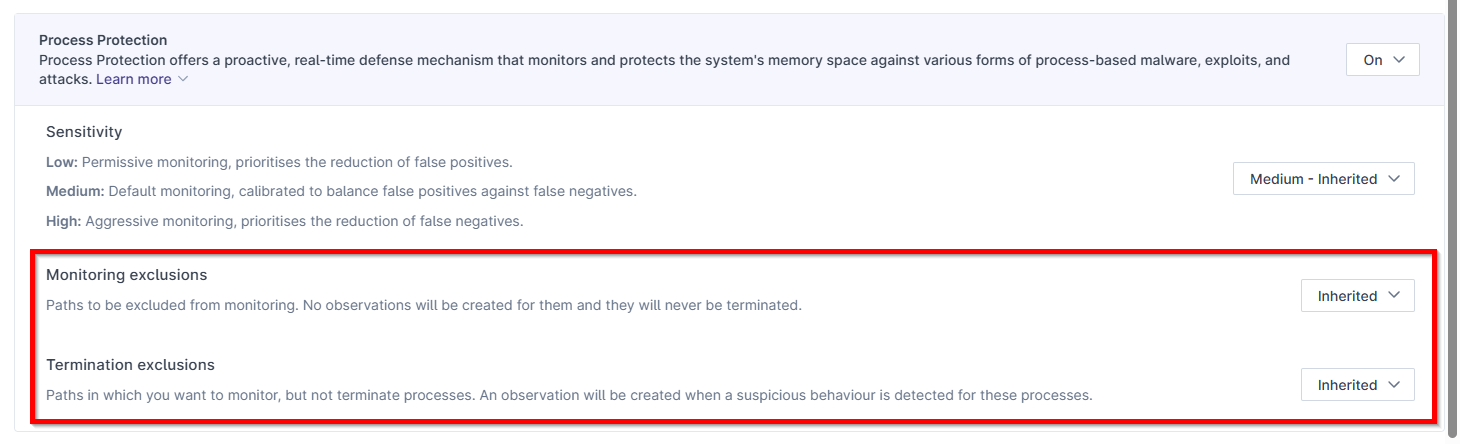
Monitoring Exclusionsenables users to specify processes they wish to be excluded from monitoring. These will not be scanned and will be allowed access across all devices within the segment. -
Termination Exclusionsenables users to specify processes they wish to be excluded from automatic termination. If scanned and found to be malicious, they will not be automatically terminated. This applies across all devices within the segment.
- Test Your Policies: Validate policies in a controlled environment to ensure they work as intended without disrupting legitimate activities.
Managing quarantined files
When Antimalware runs with the Automated response protection level, EPP acts on a malicious file as soon as it finds it. What it does depends on the device:
| Device | What EPP does | Can the file be restored or deleted from SenseOn? |
|---|---|---|
| Windows, Universal Sensor v6.8.0 or later | Quarantines the file. It is moved to a secure location on the same device, hidden from the endpoint user, and can no longer run. | Yes, from the case. |
| macOS, or Windows on an earlier sensor version | Blocks access to the file where it sits. The file is not moved. | No. Unblock it with a response exclusion instead. |
There is no separate quarantine vault or quarantine list in SenseOn. Each quarantined file is managed from the case it raised.
Finding the quarantined file
Every quarantine raises a case. Open the case and look at the remediation panel, where the action appears as EPP - Malware quarantined in observation followed by the observation letter. Expand it with Review available options to see the device, file name, file hash and full path of the quarantined file.
A quarantined file stays in quarantine until someone chooses what to do with it. It does not expire and is not released automatically.
Restoring or deleting a quarantined file
Under Choose an action, the panel offers two options:
- Delete the quarantined file. Permanently removes the file from the device. You must tick Confirm permanent file deletion. before the request is sent, and the deletion cannot be reversed.
- Restore the quarantined file. Returns the file to its original location on the device, where it can run again. Only restore a file once you are confident it is safe.
You can also do nothing, in which case the file stays safely in quarantine.
Each option opens a confirmation dialog, titled Request to delete a quarantined file or Request to restore a quarantined file. Once you confirm, the panel shows the request as in progress, then as EPP - File deleted or EPP - File restored, together with the time and the user who acted. If the request fails, the panel says so and the file remains securely quarantined.
What happens after a restore
Restoring a file also stops EPP quarantining it again. SenseOn adds the file to the Response exclusions list of the device's highest priority segment, and the panel confirms this with File added to exclusion list. The confirmation dialog names that segment before you confirm.
Because the exclusion is added at segment level, it applies to every device in that segment, not only the device the file was restored on. Review it in Settings > Device Configuration, and remove or narrow it if the file should only be trusted on some devices. EPP Exclusions explains how path, process and hash exclusions behave.
Unblocking a file on macOS
On macOS, and on Windows devices running a sensor earlier than v6.8.0, there is nothing to restore because the file was never moved. The case explains that the file was blocked rather than quarantined. To allow a blocked file, add it to the Response exclusions list of the device's highest priority segment in Settings > Device Configuration. A device can belong to several segments, and where their settings conflict the higher priority segment wins, so an exclusion added to a lower priority segment may not take effect. See Device Segments.
End user notifications
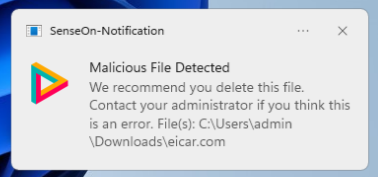
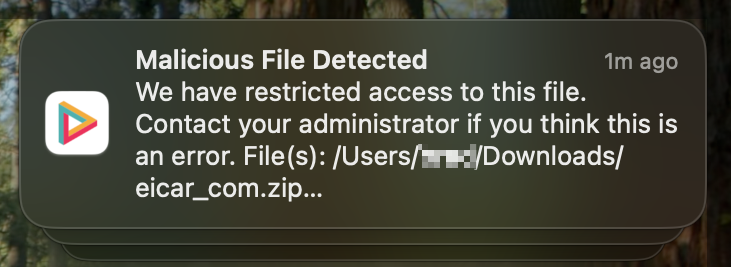
If the EPP feature is enabled, end users will receive notifications when a malicious file is detected. These notifications will inform the user that a file has been detected and potentially blocked.
An example of the notification on Windows is shown below:
An example of the notification on macOS is shown below:
Phased Deployment Strategy
1. Pilot Testing
- Select pilot group: choose a small, representative sample of your IT environment, including various types of devices and systems.
- Monitor and adjust: closely monitor the pilot deployment for any issues or disruptions. Adjust configurations as necessary to minimise impact.
2. Phased Rollout
- Segment your rollout: divide your IT estate into manageable segments. Consider starting with non-critical systems before moving to more critical ones. Refer to the above instructions on how to do this.
- Schedule rollouts: plan your rollouts during low-activity periods to mitigate potential disruptions to business operations.
3. Continuous Monitoring
- Real-time monitoring: utilise the EPP’s real-time monitoring capabilities to detect and respond to threats swiftly.
- Review and refine: regularly review the performance and effectiveness of the EPP feature. Refine policies and configurations based on operational feedback and emerging threats.
Post-Deployment
1. User Training
- Educate end-users: conduct training sessions to educate end users about the EPP feature, its benefits, and any changes to their workflow.
2. Documentation and Support
- Maintain documentation: keep detailed records of configurations, policies, and any exceptions. This documentation will be invaluable for troubleshooting and future audits.
- Leverage support: utilise SenseOn’s support resources for any technical challenges or questions that arise during or after deployment.
3. Regular Updates and Maintenance
- Apply updates promptly: regularly update the Universal Sensor to ensure protection against the latest threats. Schedule updates during off-peak hours to reduce business impact.
Conclusion
Implementing the SenseOn Universal Sensor EPP feature across your IT estate requires careful planning, testing, and monitoring to ensure its effectiveness and compatibility. By following the best practices outlined in this document, you can achieve a balance between robust security and uninterrupted business operations.