Troubleshooting
This page lists the most common things to check when the SenseOn Universal Sensor is not working as expected on a host: the agent is missing, the service is not running, the configuration is empty, or telemetry is not reaching the platform.
Use this page as a self-service first pass before contacting support@senseon.io. For each operating system, the checks follow the same order:
- Is the agent installed?
- Is the service running?
- Is the configuration valid (does the agent have an installer key)?
- Can the host resolve and reach SenseOn's domains?
- If you need to send diagnostic logs to support, how to generate them.
Want background on what the agent does? See How the Universal Sensor Works for the architectural overview.
Installation
Installation blocked or failing
If the bootstrapper or sensor fails to install, the two most common environmental causes are:
- TLS interception. A network SSL inspection proxy breaks the certificate check the bootstrapper performs while downloading its configuration, which typically surfaces as Windows Installer error 1603 in the install log. See Endpoint Requirements: TLS Interception.
- Antivirus or EDR blocking. A third-party antivirus or EDR product may quarantine or block the SenseOn installer, bootstrapper, or sensor before installation can complete. See Endpoint Requirements: Antivirus and EDR Exclusions.
Running the Install Script in Verbose Mode
If the install script fails, re-run it with verbose logging enabled and send the output to support@senseon.io along with any log files listed below.
Linux (Debian/Ubuntu)
- Download the install script:
curl -fsSL https://<your-tenant>.senseon.io/install.sh -o install.sh
- Run it with verbose output:
sudo SENSEON_INSTALLER_KEY="<your-installer-key>" VERBOSE=true bash install.sh
Send us the terminal output and the file /var/log/apt/term.log.
Linux (RHEL/CentOS/Fedora)
- Download the install script:
curl -fsSL https://<your-tenant>.senseon.io/install.sh -o install.sh
- Run it with verbose output:
sudo SENSEON_INSTALLER_KEY="<your-installer-key>" VERBOSE=true bash install.sh
Send us the terminal output — rpm will print verbose install detail directly to the terminal when VERBOSE=true is set.
macOS (Install Script)
- Download the install script:
curl -fsSL https://<your-tenant>.senseon.io/install.sh -o install.sh
- Run it with verbose output:
sudo SENSEON_INSTALLER_KEY="<your-installer-key>" VERBOSE=true bash install.sh
Send us the terminal output and the file /var/log/install.log.
Windows
These steps must be run in an elevated PowerShell terminal. Open
Start, search forPowerShell, right-click it and select Run as administrator.
- Download the install script to a local file:
iwr -useb https://<your-tenant>.senseon.io/install.ps1 -OutFile install.ps1
- Set your installer key and enable verbose output, then invoke the script in a child process:
$env:SENSEON_INSTALLER_KEY = "<your-installer-key>"
$env:VERBOSE = "true"
powershell -ExecutionPolicy Bypass -File install.ps1
Send us the terminal output. If the error occurs at the install stage, also send the MSI log — the error message will confirm the path, typically:
C:\Users\<username>\AppData\Local\Temp\senseon-install.log
-ExecutionPolicy Bypass? Many managed endpoints block unsigned scripts by default. This flag overrides that restriction for the child process only — it does not change your system's execution policy permanently.
-File? Running withpowershell -Filespawns a child process. If the script errors, only the child exits — your parent terminal stays open so you can read the full output.
Bootstrapper Logs
The install script does not install the Universal Sensor directly. It first installs a small bootstrapper component, and the bootstrapper then downloads and installs the main sensor application. If the install command returned success but the host still does not appear in Digital Estate > Devices, or if the sensor service is not present after installation, the failure is usually in the bootstrapper step rather than the install script itself.
Collect the bootstrapper logs from the paths below and send them to support@senseon.io along with the install-script output.
| Operating system | Log directory |
|---|---|
| Linux | /var/senseon-bootstrapper/logs/ |
| macOS | /var/senseon-bootstrapper/logs/ |
| Windows | C:\ProgramData\senseon-bootstrapper\logs\bootstrapper.logs |
When to check the bootstrapper logs:
- The install command exited cleanly but the host has not registered in the SenseOn platform after 30 minutes.
- The
senseon-seedservice is missing on Windows, orsenseon-seed.serviceis missing on Linux, after installation. - The endpoint requires connectivity to
*.snson.netfor the bootstrapper to fetch the sensor package — if outbound HTTPS was blocked when the install script ran, the bootstrapper logs will show the download failure.
Windows
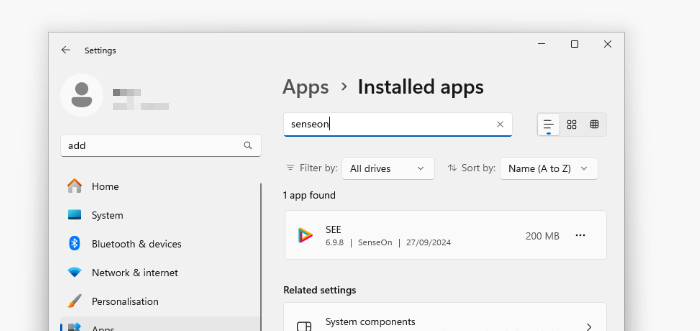
Check if the Endpoint Sensor is Installed
- Open
Add/Remove Programs(click Start and search "add or remove"). - In the list of programs, look for an item labeled
SEEand click on it. - If you don’t see an item labeled
SEE, the endpoint sensor is not installed.
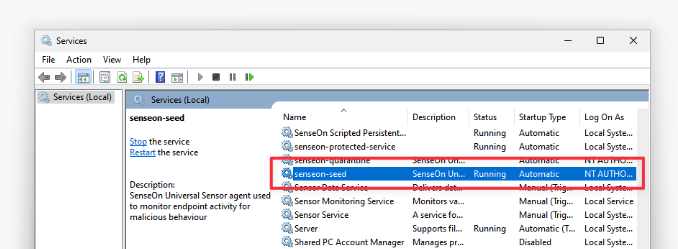
Check if the Endpoint Sensor is Running
- Open Services by clicking Start, run
services.msc. - In the list of services, look for an item labeled
senseon-seedand confirm its status is "Running". - If the service is not running, continue with the troubleshooting steps.
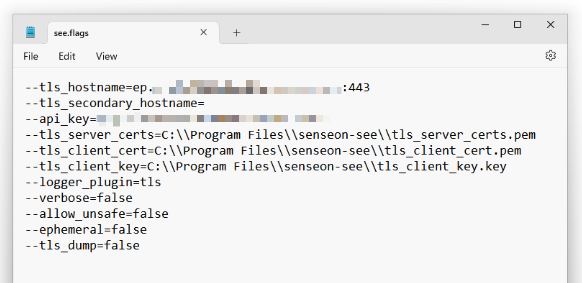
Check if Endpoint Sensor is Correctly Configured
- Click
Startand openFile Explorer. - Navigate to
C:\Program Files\senseon-see. - Double-click on
see.flagsand chooseMore appsthen open withNotepadby pressingOk. - Check the contents of the file. If they look similar to the screenshot below, the endpoint sensor has likely been configured correctly. If the file is empty or contains something similar to
{}, the endpoint sensor was installed without an installer key. Re-run the install command from Settings > Universal Sensor with theSENSEON_INSTALLER_KEYenvironment variable set. There is no need to uninstall the software before doing this.
Example of healthy see.flags file.
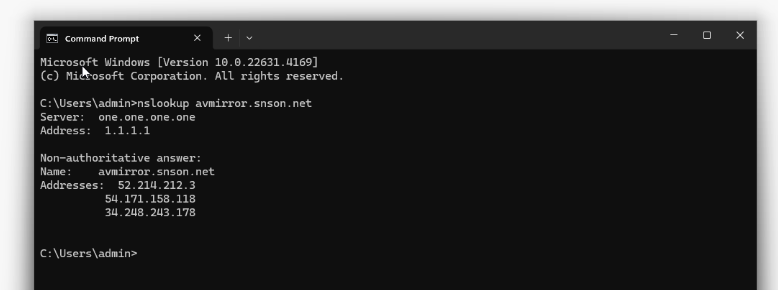
Check DNS Resolution
- Click
Startand openCommand Prompt. - Enter
nslookup avmirror.snson.net - The output should indicate a valid resolution for
avmirror.snson.netas shown below. If there is no valid response, check the DNS configuration of the system.
Check for TLS Interception
We ensure the security of your data by using mutual TLS 1.2+ for encryption. This ensures that all communications between your endpoints and our servers are securely encrypted and authenticated. However, if your system is performing TLS interception, it can alter the encryption keys. This change can prevent the endpoint sensor from successfully calling back.
If your system uses mutual TLS, you must set a bypass for the domain: *.snson.net
Generate Debugging Logs
- Stop the endpoint sensor service.
- Open
Startby clicking the Windows symbol on the bottom left corner or by pressing the Windows Key on your keyboard. - Search for
Services(orservices.msc) and click the top result to open the console. - Double-click the service called
senseon-seed. - Click the
Stopbutton. - Confirm the service is stopped by checking the list of services.
- Open
- Open a PowerShell terminal as Administrator.
- Open
Startby clicking the Windows symbol on the bottom left corner or by pressing the Windows Key on your keyboard. - Search for
Powershell.exe. - Right-click on
Powershelland selectRun as administrator.
- Open
- Start a transcript by running the command
start-transcript -path C:\senseon_output.txt. - Run the endpoint sensor with debugging logs with the command
&"C:\Program Files\senseon-see\senseon-seed\senseon-seed.exe" --flagfile="C:\Program Files\senseon-see\see.flags" --verbose=true --allow_unsafe=true. - After 60 seconds of generating logs, stop the endpoint sensor by pressing
Ctrl+Cin the PowerShell window. - Stop the transcript with the command
stop-transcript. - Send the file located at
C:\senseon_output.txtto SenseOn support. - Start the endpoint sensor service.
- Open
Startby clicking the Windows symbol on the bottom left corner or by pressing the Windows Key on your keyboard. - Search for
Services(orservices.msc) and click the top result to open the console. - Double-click the service called
senseon-seed. - Click the
Startbutton. - Confirm the service is stopped by checking the list of services.
- Open
Linux
Check if the Endpoint Sensor is Running
- Open the terminal.
- Run the command
systemctl status senseon-seed.service. - The line beginning
Active:will indicate the status of the endpoint sensor.
Check if Endpoint Sensor is Correctly Configured
Check the contents of the file /etc/senseon-see/see.flags; if this has no values, it indicates the installation could not find the installer key.
A correct see.flags file should look like the output below.
$ sudo cat /etc/senseon-see/see.flags
--tls_hostname=ep.<omitted>.snson.net:443
--tls_secondary_hostname=
--api_key=<omitted>
--tls_server_certs=/etc/senseon-see/tls_server_certs.pem
--tls_client_cert=/etc/senseon-see/tls_client_cert.pem
--tls_client_key=/etc/senseon-see/tls_client_key.key
--logger_plugin=tls
--verbose=false
--allow_unsafe=false
--ephemeral=false
--tls_dump=false
To resolve this, re-run the install command from Settings > Universal Sensor with the SENSEON_INSTALLER_KEY environment variable set.
Check DNS Resolution
- Open the terminal.
- Enter
nslookup avmirror.snson.net. - The output should indicate a valid resolution for
avmirror.snson.netas shown below. If there is no valid response, check the DNS configuration of the system.
$ nslookup avmirror.snson.net
Server:     127.0.0.53
Address:    127.0.0.53#53

Non-authoritative answer:
Name:   avmirror.snson.net
Address: 52.49.118.219
Name:   avmirror.snson.net
Address: 52.212.129.89
Name:   avmirror.snson.net
Address: 52.19.214.51
Check for TLS interception
We ensure the security of your data by using mutual TLS 1.2+ for encryption. This ensures that all communications between your endpoints and our servers are securely encrypted and authenticated. However, if your system is performing TLS interception, it can alter the encryption keys. This change can prevent the endpoint sensor from successfully calling back.
If your system uses mutual TLS, we recommend setting up a bypass for our domain: *.snson.net.
Generate Debugging logs
- Stop the endpoint sensor service using the command
systemctl stop senseon-seed - Open the following file in a text editor:
/etc/senseon-see/see.flags - Change the line starting with
--logger_plugin=tlsto--logger_plugin=tls,filesystem - At the bottom of the file add a new line as follows:
--logger_path=/var/log/senseon-see/ - Save the file.
- Start the endpoint sensor service using the command
systemctl start senseon-seed - Send the output of the debugging logs to the SenseOn support team
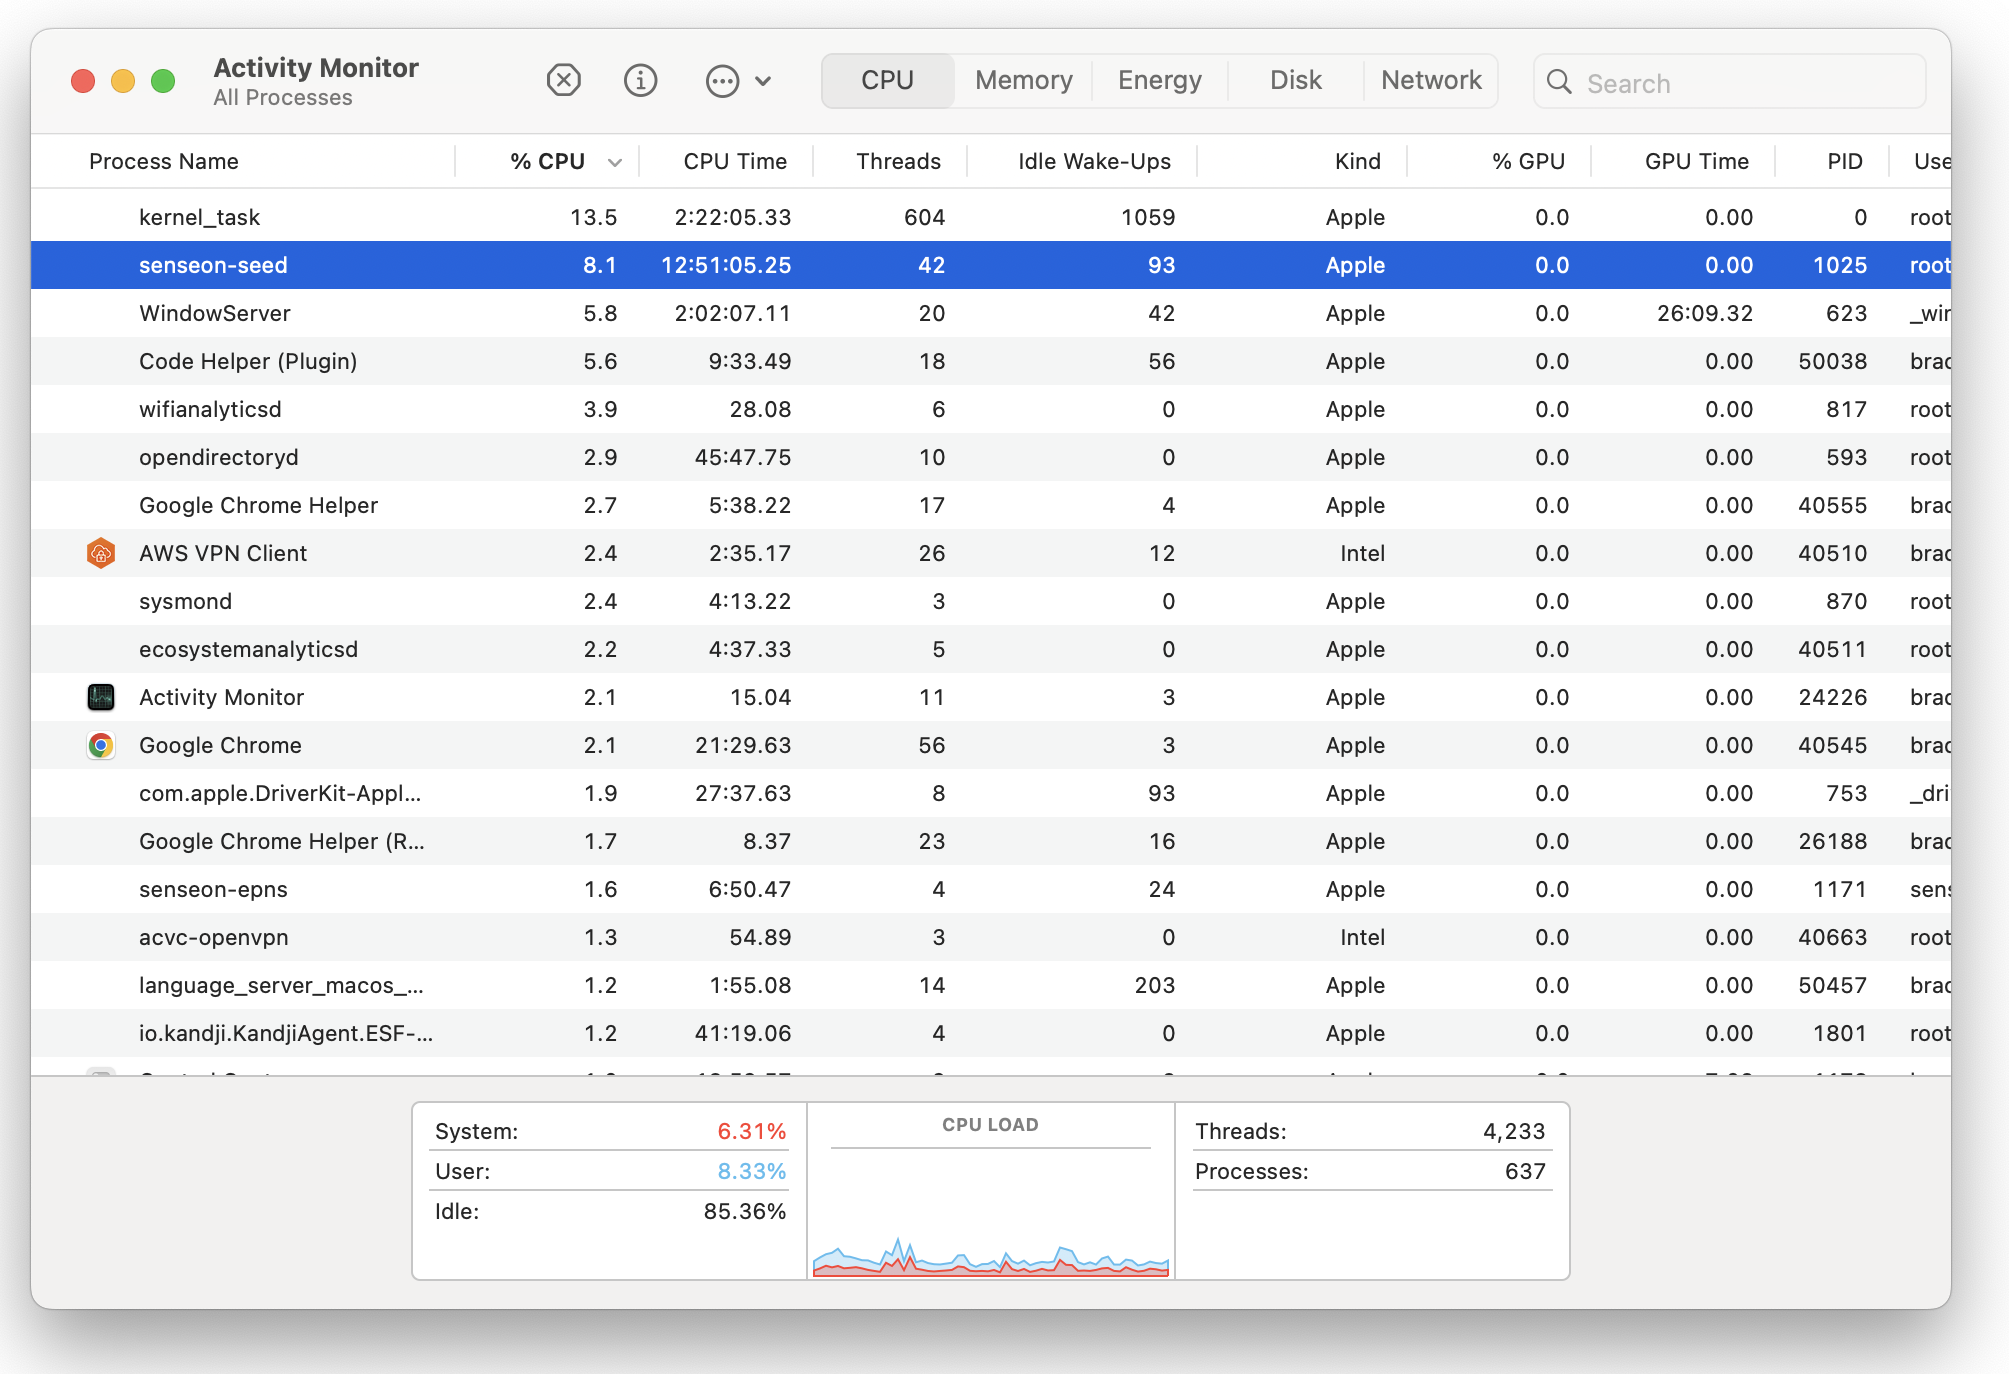
MacOs
Check if the endpoint sensor is running
The SenseOn installation package will be installed to /opt/senseon-see/
The process name of the SenseOn sensor on MacOs is senseon-see and you can verify it is running using the built in Activity Monitor.
Check if endpoint sensor is correctly configured
- Open the
Terminalapplication - Go to the SenseOn folder by entering
cd /var/senseon-see - Read the configuration settings with the command
sudo cat see.flagsand entering your password. - Check the contents of the file look similar to the output below; if it does the endpoint sensor has likely been configured correctly. If the file is empty or contains something similar to
{ }the endpoint sensor was installed without an installer key. Re-run the install command from Settings > Universal Sensor with theSENSEON_INSTALLER_KEYenvironment variable set. There is no need to uninstall the software before doing this.$ sudo cat /etc/senseon-see/see.flags --tls_hostname=ep.<omitted>.snson.net:443 --tls_secondary_hostname= --api_key=<omitted> --tls_server_certs=/etc/senseon-see/tls_server_certs.pem --tls_client_cert=/etc/senseon-see/tls_client_cert.pem --tls_client_key=/etc/senseon-see/tls_client_key.key --logger_plugin=tls --verbose=false --allow_unsafe=false --ephemeral=false --tls_dump=false
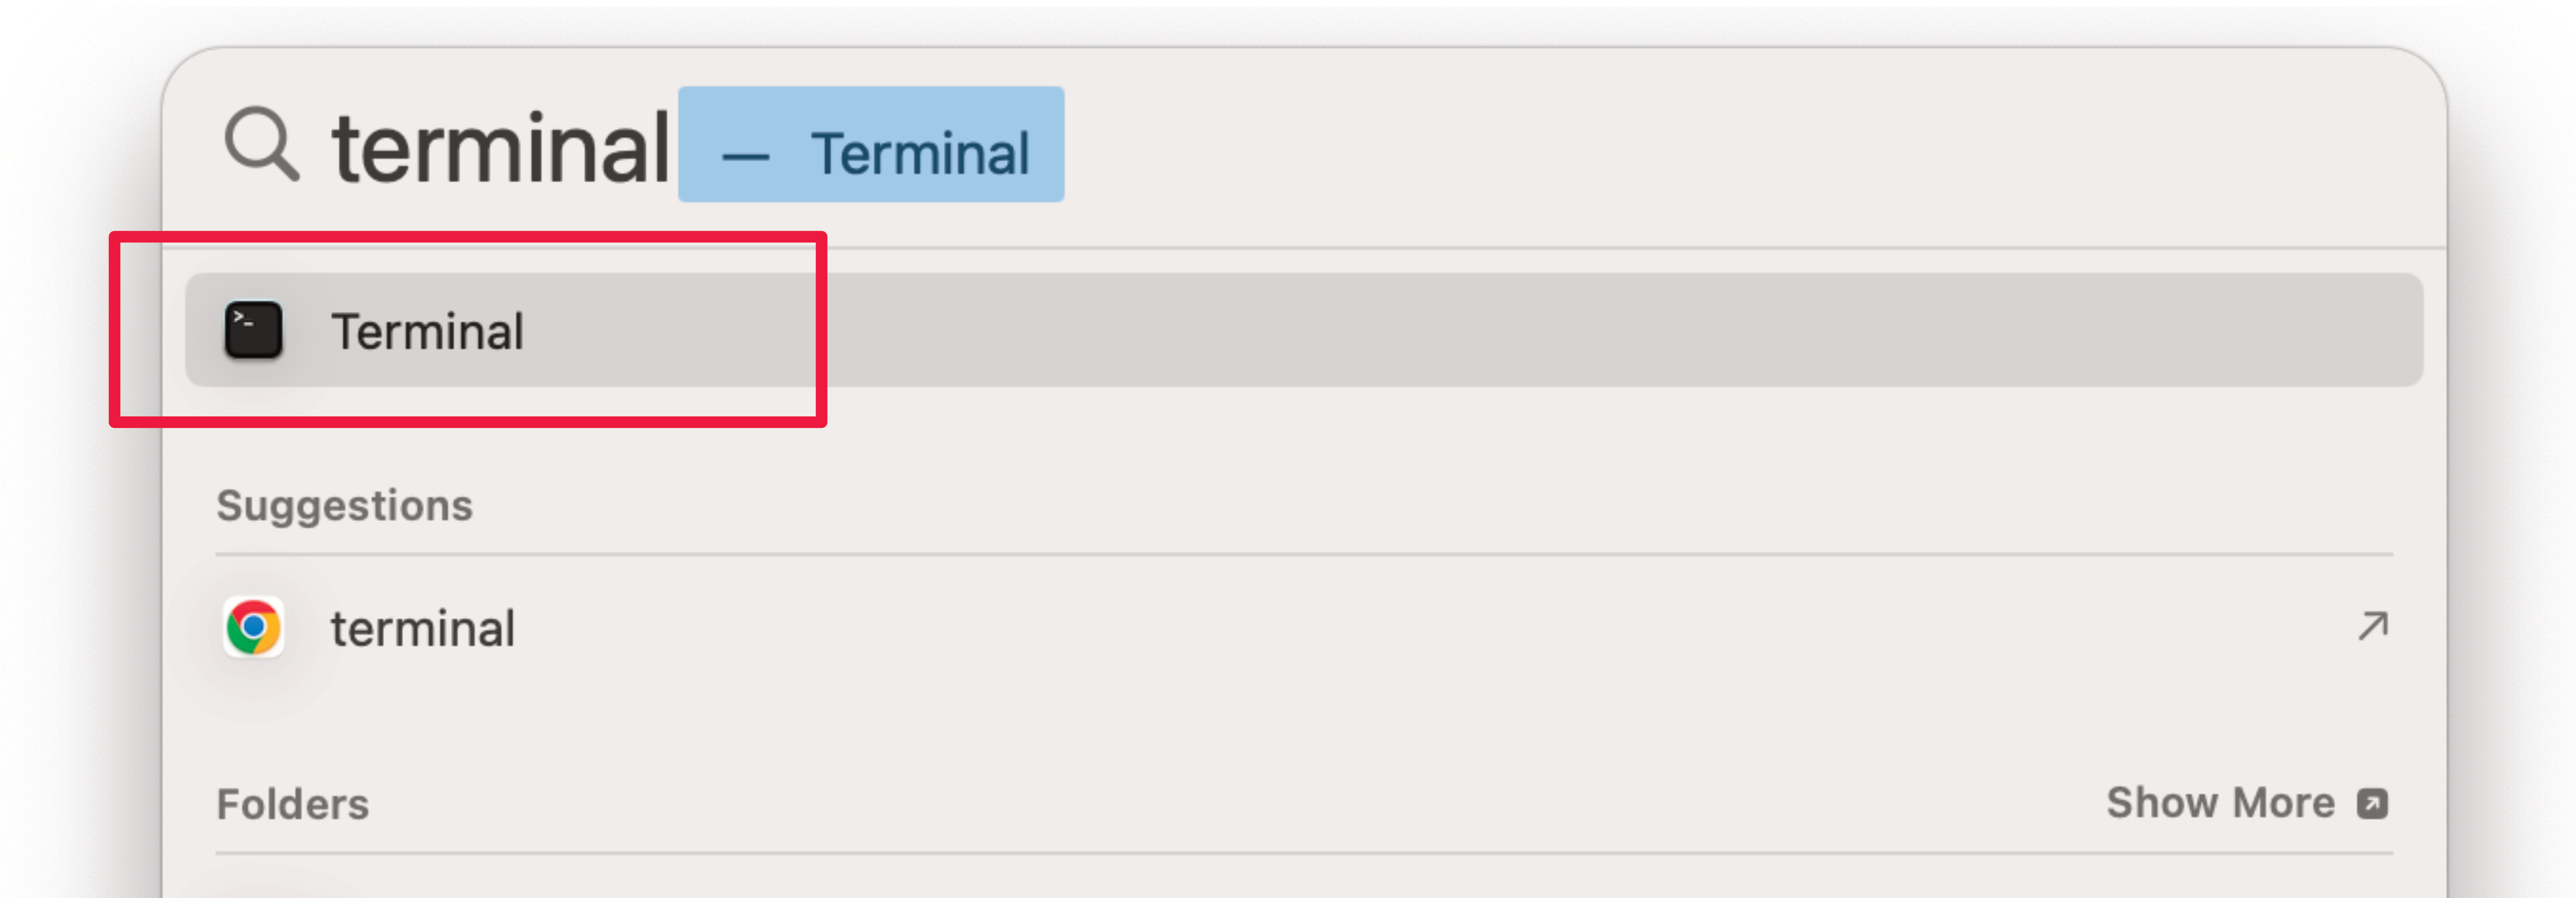
Check DNS resolution
Confirm that the host is able to resolve external domain names.
- Open the spotlight search by clicking on the magnifying glass in the top right of the screen.

- Search for terminal and click on the terminal icon.
- In the terminal enter the following command.
The output should look similar to the following. If there is no output from the command it indicates that DNS resolution has failed.
dscacheutil -q host -a name avmirror.snson.net
name: avmirror.snson.net
ip_address: 52.208.237.25
ip_address: 52.30.114.205
ip_address: 34.252.255.207
Check for TLS Interception
We ensure the security of your data by using mutual TLS 1.2+ for encryption. This ensures that all communications between your endpoints and our servers are securely encrypted and authenticated. However, if your system is performing TLS interception, it can alter the encryption keys. This change can prevent the endpoint sensor from successfully calling back.
If your system uses mutual TLS, we recommend setting up a bypass for our domain: *.snson.net.
Generate Debugging Logs
- Stop the endpoint sensor service using the command
systemctl stop senseon-seed. - Open the following file in a text editor:
/etc/senseon-see/see.flags. - Change the line starting with
--logger_plugin=tlsto--logger_plugin=tls,filesystem. - At the bottom of the file, add a new line as follows:
--logger_path=/var/log/senseon-see/. - Save the file.
- Start the endpoint sensor service using the command
systemctl start senseon-seed. - Send the output of the debugging logs to the SenseOn support team.